The way in which groups were formed for the client projects is the students choose a brief that they
felt that could challenge and showcase their skills The client requested a tree trail app, that could be
downloaded, for users to be able to locate different trees, in Winchester city. It was for this reason I
selected the 'Winchester's Tree Trail'.
For this project my contribution was the website development as there were multiple designers in this
group.
*Something to note for this project is that unfortunately my computer got wiped and I lost nearly all of
the screenshots I had planned to add for this project*.
PWA research
Due to the client's request for the trail needing to be downloadable/ accessible offline, I began looking
into alternatives to a standard website. Whilst doing this I found PWAs, also known as a 'Progressive
Web App'. A PWA can use website features in combination with progressive features that ultimately give
the user an 'app like' experience.
Some of the benefits include:
The build of an app can take a long time from start to finish due to needing to be approved by the
app store. Building it as a website means that you can bypass the App Store, as well as its
associated costs.
There is documentation to follow (making it easier). If it is SSL (secure sockets layer) secure then
Google will approve it, and as a developer this is very useful.
Like websites, they can be made to be SSL secure (Secure sockets layer). This keeps internet
connections secure and prevents information from being read, changed or transferred between systems
by online hackers.
PWAs are network
independent, meaning that they can still be installed as a desktop icon, giving that
app-like feel. Although this can create issues in some scenarios, for this situation being able to
view that app without internet connection is ideal.
HTML
HTML was used to build the structure and pages of the Tree Trail.
SASS
I used SCSS to style the pages based on the logo provided to me.
JavaScript
I worked within frameworks to create the map and location functionality for the trail.
The history of JavaScript
From previous experience, I knew that in order to create a more seamless user experience, it would be
wise to build the location
functionality of this trail using JavaScript. To educate myself further I decided the best way to move
forward with this project was to investigate the
history of it and how it has developed to it's most advanced
version today.
Vanilla JS:
The first and most basic version of JS (JavaScript) is known as Vanilla JS. The problem with this
was that all browsers interpret code differently so you would end up having a large amount to do
the same task.
jQuery was the first ever JS framework to be written and it means that all browsers use the data in
the same way.
Angular was next making it the first 3rd wave of JS. It was set up and maintained by Google and is
still around today, however when it changed at version 2, it lost a lot of traction as people who
had already used version 1 needed a familiar language to use for existing projects and experience.
Facebook took off and wanted to create its own framework and this happened in 2013 when ‘React’ was
made. React is still the most popular form of JS, it preloads content before the page is completed
ensuring that users stay interested. It also has React Native which is used for mobile applications.
An Angular engineer went solo and then created Vue.js. Vue allows the framework to custom built
using elements to develop more complex functionality.
This framework was then built into its own framework and Nuxt.js was created.
The advantage of this programming development includes:
That you are able to use standardised components.
It reads the same on every browser.
Vue.js is appreciated in the development community.
It is also future proofed, although it may progress the core functionality and elements are the
same so
a developer will always have enough of an understanding.
Node JS:
‘Node’ is a JavaScript runtime environment, meaning that you could run a server and JavaScript. It can
also be used front and backend and is an alternative to PHP; PHP is still extremely popular.
An example of a company which is built with Node.js is Spotify.
Using Node allows developers to create sever side and become a full stack developer.
Node runs a small server and updates automatically.
I then looked at how to install Node.js’ package manager to install Nuxt.js. I used the CMD line or also
known as a terminal to do this, it allows the developer to run to the server automatically. I am using
this
method instead of MAMP as it is good practice. Using Nuxt means that the terminal does a lot of the
configuration for me.
The server
It displays as ‘localhost:3000’. Local host means that it is running on my computer and using port 3000
as a
computer has a lot of ports and Node commonly uses 3000.
The benefits of working this way is that you can work collaboratively on the same server and it ‘hot
reloads’, meaning that as soon as you save your text editor file the page auto reloads. This saves time,
especially when you may be coding for long periods.
Whilst setting up the pages I opened the ‘package.json’ and this stores the configuration files and the
‘node modules’ which stores all the NPM packages.
I created a few pages using ‘vue.js’ such as home, about, contact and tested whether I was able to
navigate between them through the URL. It is good practice to work this way and also it means
that the pages are more search friendly and the URL is better organised. The developer is then working
fully in the browser.
Running the database
Although this is a ‘group client project’, unfortunately our client had to pull out and could no longer
work with the university. In order to progress with this project I will be using the data from a
public website of a tree trail in Winchester.
Initially I gathered all this data in a spreadsheet with the categories for each item that I wanted to
be displayed on the trail. To see an example of this, click here.
I used Google based platform called Firebase to
integrate the data on
to my web application. I installed this
through the Command Line
. The reason I used Firebase is because it
allows for real-time databases, offers storage, is beneficial when creating a proof of concept and means
that I can focus on the frontend of this web application as it runs the backend for me.
The build
Every time you create a new project and you need to reinstall nuxt.js, I did this following
the documentation and through
the Command Line. With the installation, this saved in ‘node_modules’ and this is where all the
components for the application can be found.
To begin with, I create the structure of the website by making an organised directory and adding in the
necessary pages. I knew what these pages were going to be from the mockup I had made to discuss with the
client.
Creating dynamic pages
I then created two dynamic pages, one for ‘Trails’ and one for ‘Trees.’ A dynamic page is effectively a
template page that can be used to save time and avoid having to repeat the process. The way in which I
did this was by creating a ‘.vue’ file with an underscore before the name. I named the files ‘_slug.vue’
as you are then able to access the value using a certain tag.
By doing this, it means that I have already got the template pages ready for the data to be added for
both ‘trees’ and ‘trails’ without having to make individual pages.
(There were screenshots to see the basic version of this page whilst it was in the testing stages,
however this was one of the ones lost).
Google Firebase
Next, I installed Firebase using the Command Line, and by
following the documentation. Firebase is an
application created by Google that aids developers in creating iOS, Android and web apps with a
'cloud-based' database.
The database was the main reason I used Firebase in this project as it allowed me to pull across the
data (the list of trees and its corresponding information).
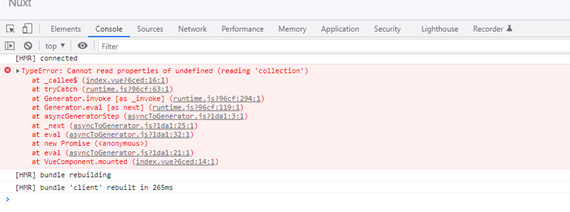
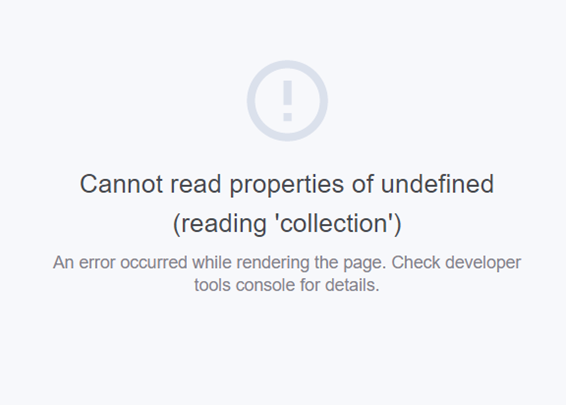
Many errors were seen whilst trying to achieve this, you can see one from the screenshots below.
The way I overcame these challenges was by searching the error message online and reading how other
developers have resolved these issues. Using nuxt.js or other JavaScript frameworks means that when
you are building your website or application, there is a slightly different process. Instead of
having general code on all pages, for this project I am breaking down each page into components. For
example, the screen below will have a ‘style’ section with CSS that is specifically controlling the
content of this page.
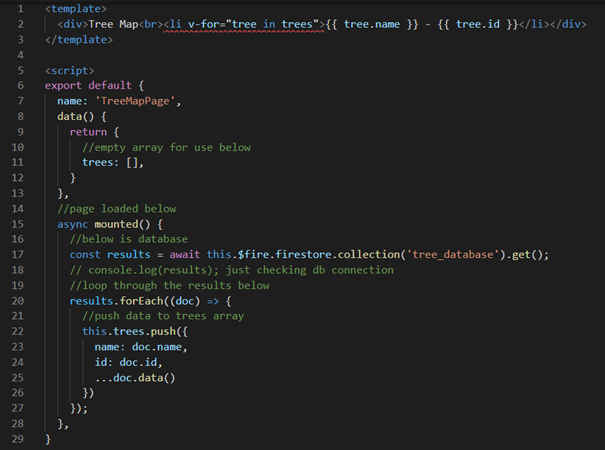
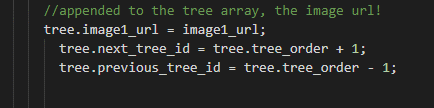
Pulling across data
The screenshot shows how I set up my page to pull the database across into my web
application. The green code is ’comment code’ which explains what I have done as you read down
the code. A variation of this code was used on both the dynamic ‘trees’ and ‘trail’ page. This
meant that I was able to set a rule for a button to move through the pages. I discuss this
further down this page in the ‘Conditional Rendering’ section.
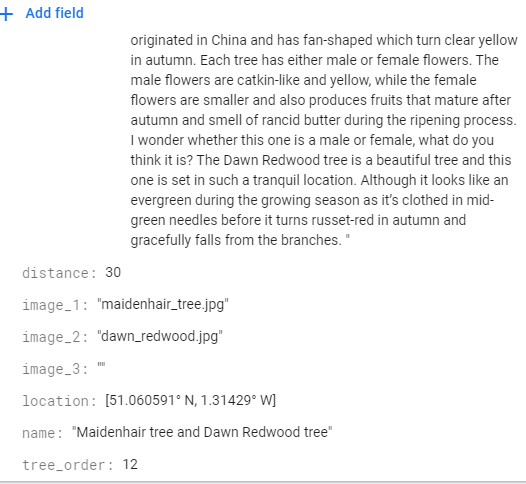
As mentioned previously, I created a spreadsheet and I copied those categories and content onto
a Firestore database. Click here
to see how the
data appears before the page has any styling
attached to it.
The map
Next I wanted to create ID’s that were being pulled across from the database and turn them into
links. With this being the build of a single page application you are
not able to use HTML’s href tag, instead 'Nuxt.js' has its own syntax being: ‘
’.
To make life easier, I ran multiple terminals to install another Vue.js package, this
one to allow for Google maps. This touches on the fact that 'Nuxt.js' is a framework,
within
the framework of 'Vue.js' which is a framework of JavaScript.
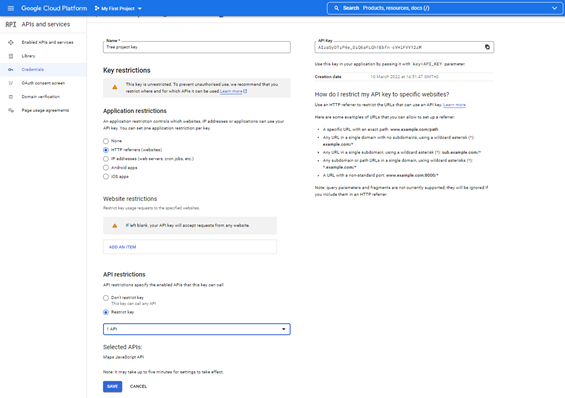
Without an API key, you are not able to embed a Google map. To get this API I followed the steps
from Google’s Developer service.
When both the map and the individual ID links were working
(see image above (workinglinksandmap.png)), I noticed an error within the URL (treestrees.png),
after playing around with Vue.js specific tags rather than HTML ones (e.g. n-link), I came to
realise that although it prefers some more than others it was actually a caching error.
At this stage in the project I was able to pull all the number/text data from the database and
get it to appear on each page dependent on the id for each tree. To see how it looked before
styling, to see this please see the image
below.
Using SASS
Similarly, to the other installs required for this project I installed an NPM package ‘-g sass’,
this was done via the Command Line (CMD). The reason for this being that the CMD will build out
the CSS files for me.
As mentioned earlier Node is a JavaScript runtime environment, this is preferable as it supports
real-time executions.
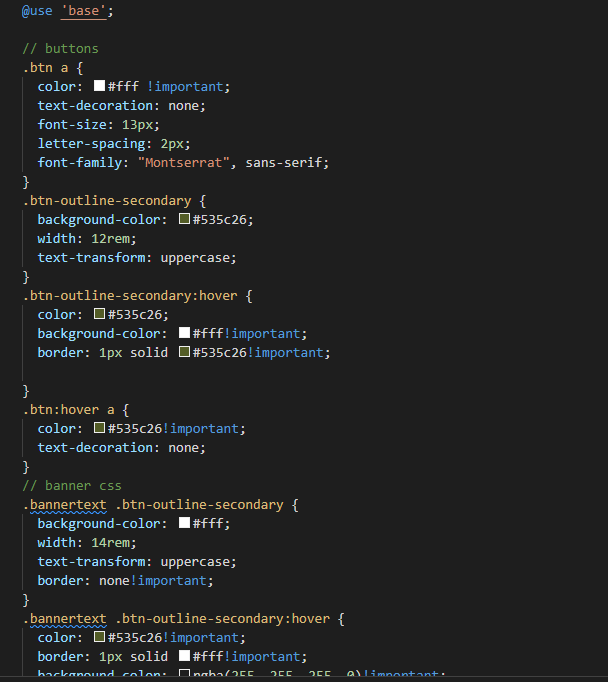
SASS (Syntactically Awesome StyleSheets), this is an extension of CSS that allows more smooth
and complex styling. When coding in .scss files you are able to define variables at the top of
the editor and then reference those variables in CSS. It allows you to edit groups of referenced
items at once. By doing this it can save time for the developer as you’re able to make that
style edit once rather than multiple time within your CSS file.
By using SASS it allows for minification to happen, this occurs within multiple coding languages
as it reduces the files size and improves the run time. This is particularly important when
using Google as it requires fast loading website.
Another positive of using SASS is that it allows you to separate your styling into components by
building with modules, the way in which you do this is by using the ‘@use’ rule and creating
another style document named ‘_base.scss’. To see
how to link the '_base' file to the 'scss' styling sheet click
here.
The above process is
very similar to the installation and use of SASS in my Transmedia project, to see this click
the button below. Additionally, you can nest within SASS like you can in HTML, making the code
easier to read and more direct, you can see this is the image above.
To progress with this project whilst waiting for the website design from the designers, I
started wireframing the basic page elements, such as the navigation bar, header, footer e.t.c.
Then using the SASS files I created, I started giving basic styling to those elements.
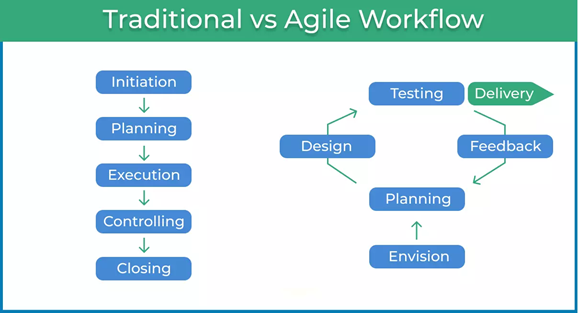
The Agile workflow and procedures
During the build of this project, I participated in a group discussion replicating an Agile
Workflow and Procedures.
What this involved is explaining your project in a ‘daily standup’ to receive feedback in an
informal yet productive manner. The reason in which some workplaces prefer to use the ‘Agile
method’ is because it is far less linear than a traditional workflow. A traditional workflow
usually consists of finishing one task and only then starting the next. The problem with that is
that opportunities for peer and employer feedback can often be missed as completing work is the
main priority.
The two different types are detailed in a flow diagram.
Importing images
To check that the tree images have been uploaded correctly so that I am able to add them to the
individual tree pages. To do this, I took the folder ID from the storage feature in Firebase and
added it to the ‘nuxt.config’ file. To see the code used click
here.
Whilst testing that each of the 17 trees had all their images showing correctly, I found that
when I had uploaded a couple of the images. I had made a typo in their image name, this created a
‘404 error’.
This error meant that I was aware that I had created an issue and that I needed to amend this. A
‘404 error’ can be useful if an outside developer is adding dynamic data incorrectly it will be
searching for data that does not exist and therefore alert them of the mistake.
Query by order
My next task was to see if there was a way to pull in specific trees from the database, by
something other than the unique ID code that is auto assigned to them.
I tried different methods to do this and debugged the code until I found the current method that
is working correctly. To do this ‘console.log’ to sanity check which areas were pulling through
the data.
As well as this, each tree was given a number from 1-17 to section them in the ‘tree order’
field. The data type was initially set as a number as you would expect, however they were only
recognised when inputted as a string. Many coding languages can be quite particular, and
JavaScript is inclusive of this. To resolve this and to avoid something similar happening if
users were adding their own data, I used ‘parseInt’. This means that the variable will always be
passed through as the data type integer.
In this project, I have also used ‘parseFloat’ when adding the coordinates, meaning that the
data will always be passed through as a decimal number.
Conditional rendering
To create the button functionality that allows the user to move forward and backwards in the trail, I
used conditional rendering. See below (condiontalrendiering1).
Conditional rendering is
JavaScript condition that allows you to create two seperate statements. One
being if something is true, complete this action. The other being for anything else, complete this
action.
Using elements
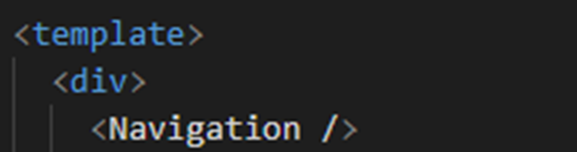
Next, I began building out the elements needed to create the specific pages. To ensure that I was
time efficient and working with good practice I made components such as a footer and header. Then
similarly to php’s ‘include’ function I used the alternative for Vue.js. To see how this was
achieved, view below. First, I needed to declare the page name in the script section of the
navigation file. To view the code for this, click
here.
Then I referenced the 'navigation block' in the
HTML template on every page. Instead of personally creating a ‘header’ section on my HTML pages,
Nuxt built out an element which is the equivalent. This is stored within the ‘nuxt.config.js’ and
this folder is created to cover most ‘use cases’. Additionally, I used the nuxt.config folder to
link my style sheet, google fonts and edit the favicon. Google fonts was installed using the install
command: ‘npm install –save-dev @nustjs/google-fonts’.
The UX
In terms of having the best user experience it might seem contradictory to be able to view two
versions of the individual tree pages. However, the reason I have kept both is given the fact that
this PWA is solely a proof of concept, if it was used in a real-life scenario the client may wish
to be able to display hundreds of trees with all their history and only want the trail to contain a
small number of those trees. With that said I have kept the ‘trail’ page and just made it the
navigation link which takes you directly to the first tree in the trail.
Linking from a server
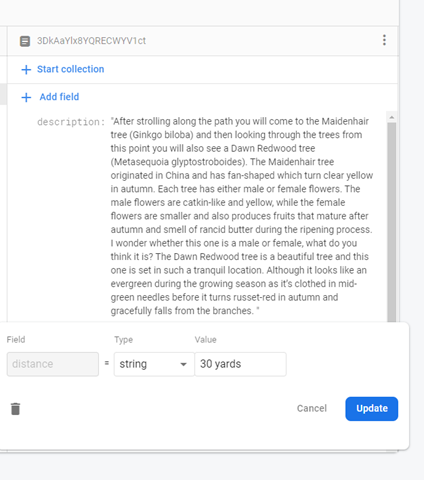
If this project was more than just a proof of concept or if I continued to develop it further in the
future, I would add the function allowing the user to see the distance between each tree. I have
already briefly looked at how I might make this happen and I found Firebase can be particular when
differentiating between a string or a number. When I added the
new field using a string it caused
the other working fields to stop being pulled across correctly. Although I have not yet created this
functionality, my first step was to fix this problem. I changed the data type to a number and by
doing this it allowed for all of the data to show correctly.
As a whole I am very pleased
with
the expansion of knowledge after this project. There is always room to better my skills but I have
learnt more about the basic rules and functions JavaScript has to offer, as well as using a
JavaScript framework. I feel as though my Tree Trail PWA fulfils the brief and could be made into a
working trail if developed more. I hope that in the future I will be able to work more closely with
a client as I feel as though it would improve my communication skills. This is a transferable skill that can be carried forward into any industry.
Areas to improve
If this project was more than just a proof of concept or if I continued to develop it further in the
future, I would adding the function allowing the user to see the distance between each tree. I have
already briefly looked at how I might make this happen and I found Firebase can be particular when
differentiating between a string or a number. When I added the
new field using a string it caused
the other working fields to stop being pulled across correctly. Although I have not yet created this
functionality, my first step was to fix this problem. I changed the data type to a number and by
doing this it allowed for all of the data to show correctly.
As a whole I a very pleased with
the expansion of knowledge after this project. There is always room to better my skills but I have
learnt more about the basic rules and functions JavaScript has to offer, as well as using a
JavaScript framework. I feel as though my Tree Trail PWA fulfils the brief and could be made into a
working trail if developed more.
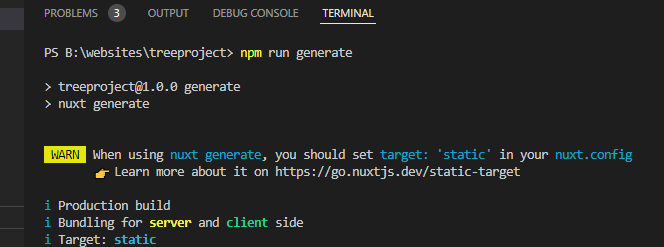
The deployment
Due to the fact that my Tree Trail is not live, I needed to add it to this portfolio so that it can
still be viewed. This proved more difficult than I had thought it would be. I built the tree project
using Nuxt, a JavaScript framework. This meant that I had
to
find a way to compile my JavaScript files into HMTL, to achieve this I used the command 'npm run
generate'. The complied files were then placed into a 'dist' folder.
From looking through lots of documentation
online, it was suggested that I try using 'target:static' and adding it to the 'build' section in my
config file. However, as you can see from the larger screenshot this created a fatal error. To
correct this
I tried adding 'target:'static'' to the 'export' section in the config file. As well as this, I used
the replace tool to change the 'n-links' in the navigation to 'NuxtLinks'.
After trying all
of
the above, the browser still struggled to locate the pages as you click through the navigation it
was only looking in the 'b:' folder despite
the fact that the pages are already in HTML format.
Instead, I added 'router: {base:"/treeproject/"}' in the build confirmation section of the config
file. This allowed my to navigate through the now HTML files for the Tree project. There were a few
images with issues once uploaded to my live website they were located in the correct place. When
uploading the folder to my portfolio website I only added the HTML files from inside the 'dist'
folder. The reason for this is because the users on my website do not need to see or have access to
the code files, all they need to see is the distribution.
Time management
This is the project that took most of my focus and I am proud of the way in which I managed my time
for it. I knew that this would be the most challenging and for that reason, I wanted to complete it
first. This meant that I had time to do touch-ups and small changes towards the end. To see the
start to
end
process and how I planned for it, see my time management chart. (To move between projects, use toggle at the bottom of the document.)
Please find attached my bibliography
of
the
research
content I used to create this project.


